Render from Excel
This feature lets you use SlidePack easily with a combination of PowerPoint templates and Excel data, without any coding required. Uploading different Excel data files to a single template will let you generate similar slide decks quickly.
Usage
Create a PowerPoint presentation to use as a template, and upload it at Render from Excel in your SlidePack Dashboard. Then create and upload an Excel file that holds the desired data values. This will generate a new PowerPoint file with your data embedded, ready for download.
Creating your template and data files
Insert placeholders in your PowerPoint template that refer to Excel cell coordinates, such as {A1} or {B5}.
Make sure those cells in your Excel file have the desired values.
See below for a detailed description of all supported syntax and features.
Placing text
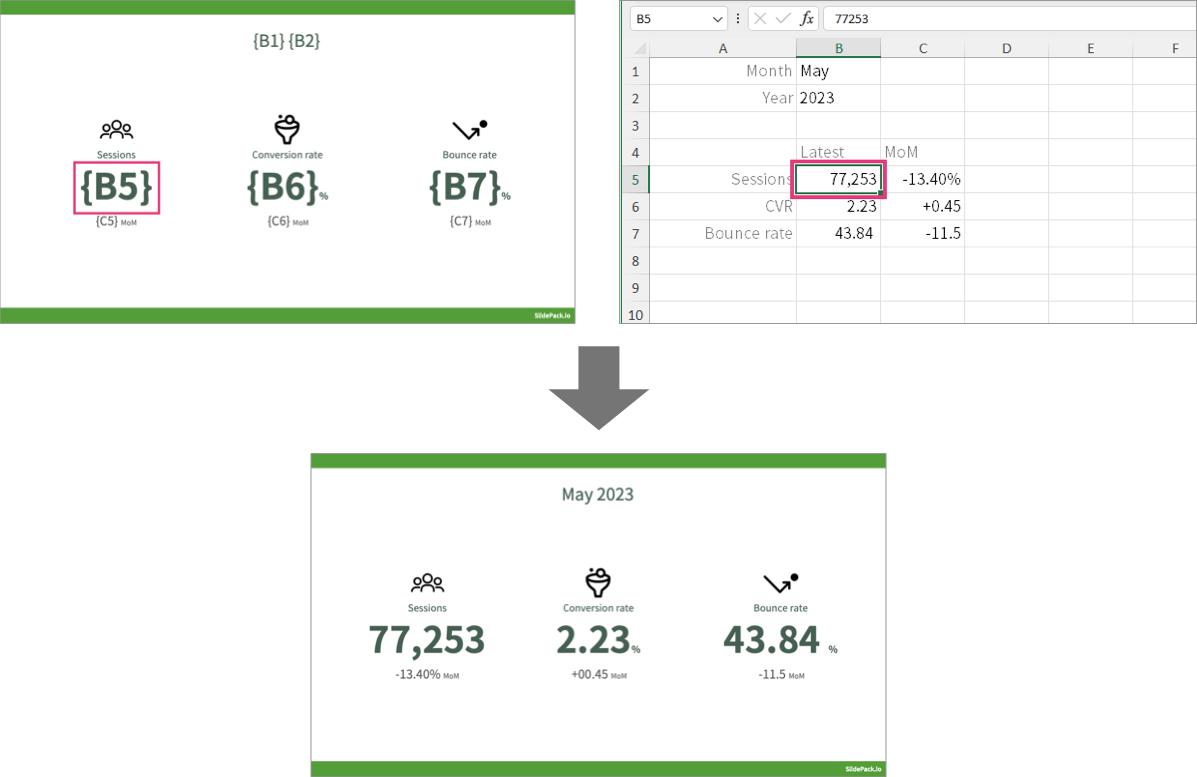
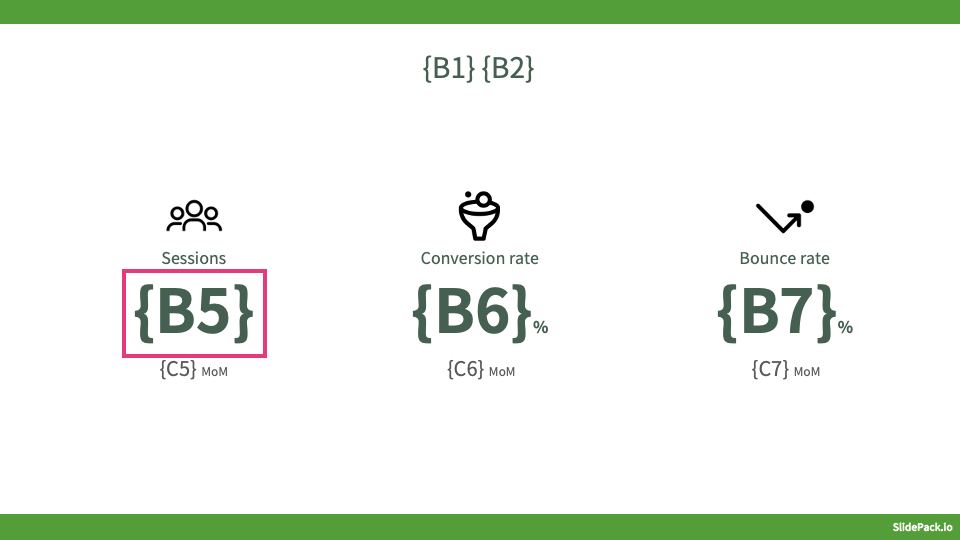
PowerPoint template
Insert placeholders that refer to Excel cell coordinates you want to pull values from, surrounded by curly braces. For example: {B5}.
template.pptx
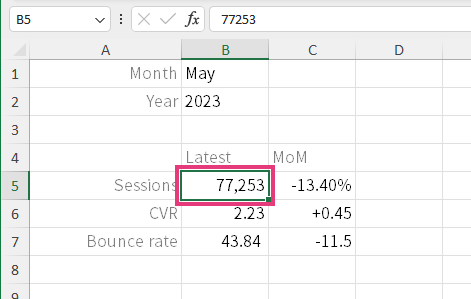
Excel workbook
Place desired values in the cells you referred to.
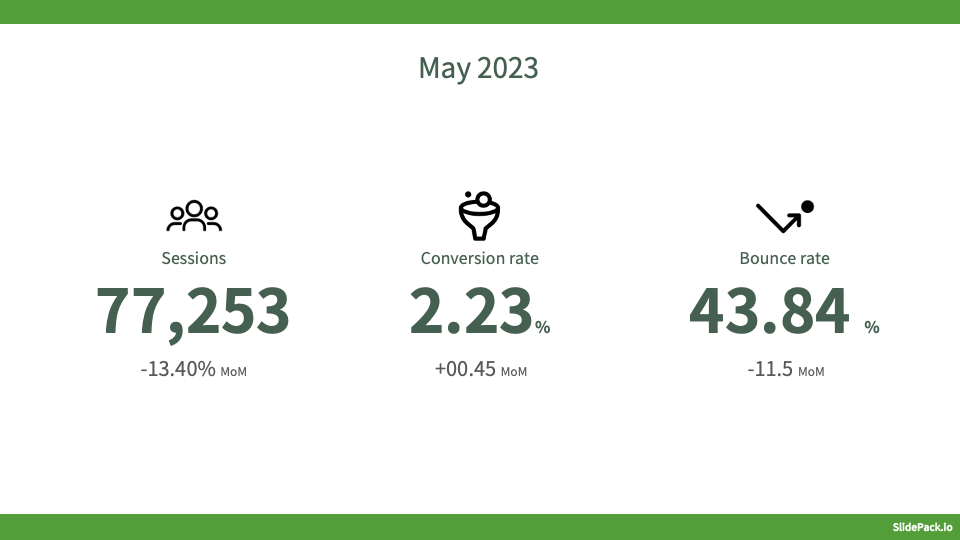
Render result
output.pptx
Placing text from a specific worksheet
PowerPoint template
Insert placeholders that refer to the Excel worksheet name and cell coordinates, surrounded by curly braces, For example: {SheetName:B5}.
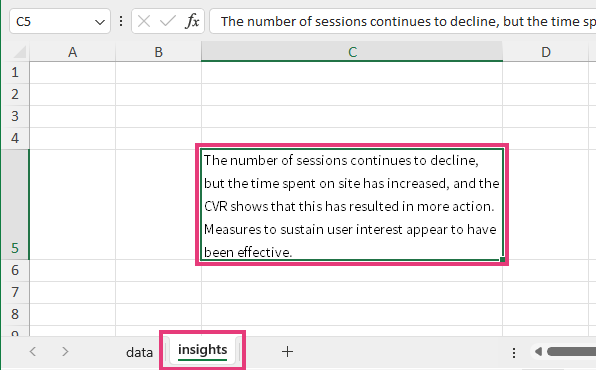
For example, if you want to get the value of cell C5 in the worksheet named "summary", you would write {summary:C5}.
template.pptx

Note that you can omit the worksheet name for the first sheet. In this example, {A1} and {data:A1} are equivalent.
Excel data
Fill the cells you referred to with the desired values.
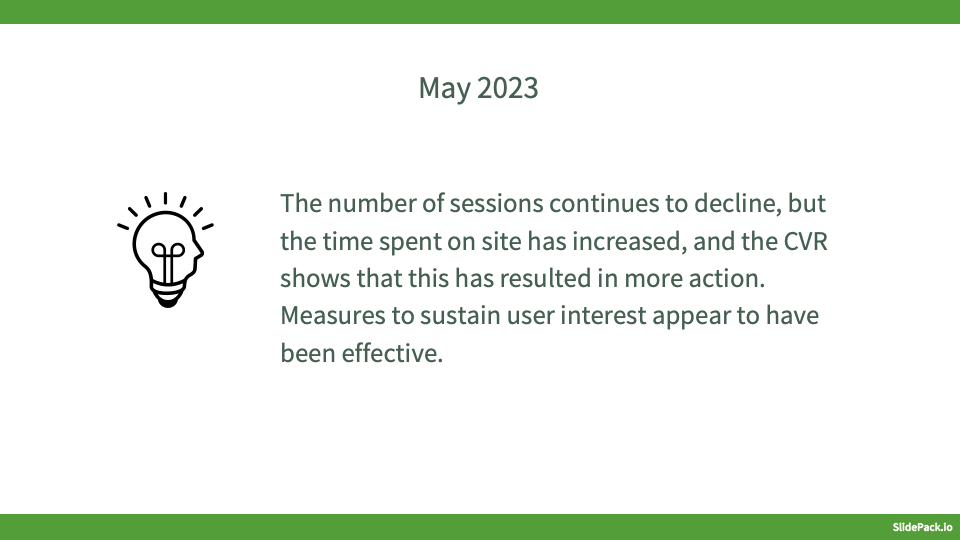
Render result
output.pptx
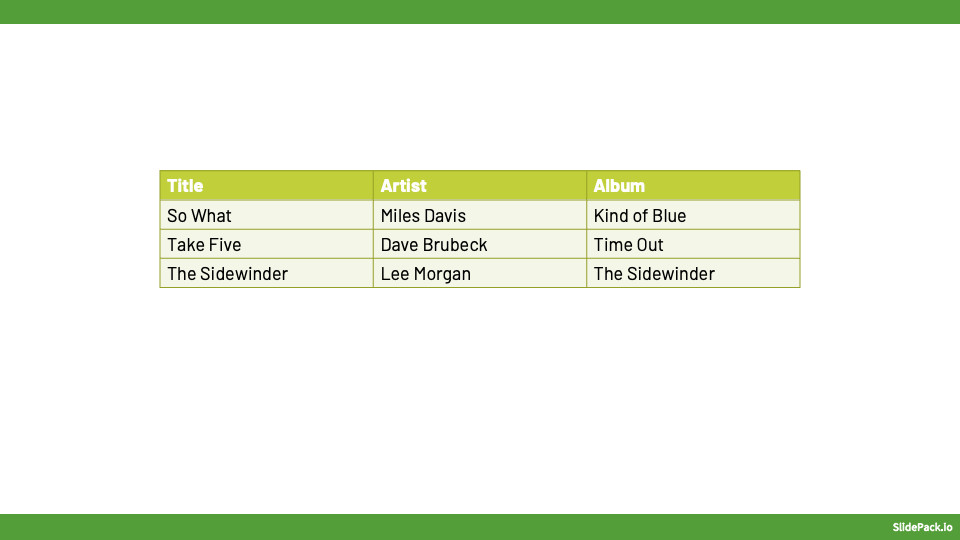
Populating tables
PowerPoint template
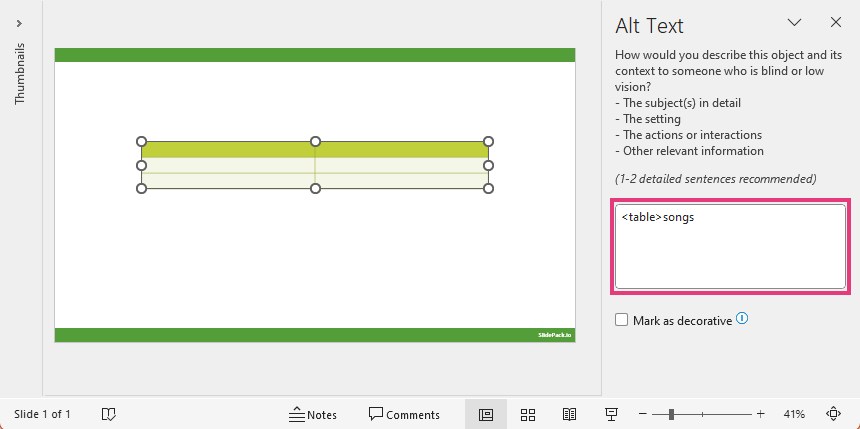
Insert a table and set a table name as its alt text.
The table name can be anything you like, but should start with <table>. For example, <table>songs.
(Right-click a table in PowerPoint and select View alt text to edit the alt text.)
template.pptx
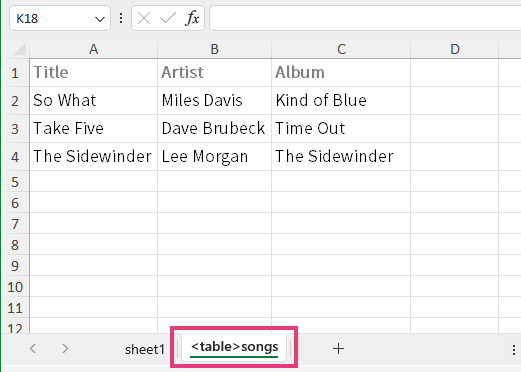
Excel workbook
Create a new worksheet and fill it with the table data. The worksheet name should be the same as the table name (alt text).
Render result
The number of rows and columns in the table will be adjusted to accomodate the data.
output.pptx
Populating charts
PowerPoint template
Insert a chart and set a chart name as its alt text.
The chart name can be anything you like, but should start with <chart>. For example, <chart>sales.
(Right-click a chart in PowerPoint and select Edit alt text to edit the alt text.)
template.pptx
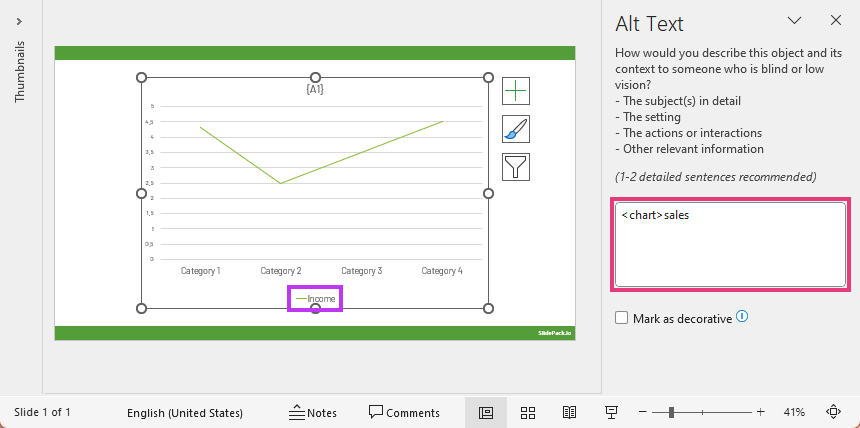
Chart values do not matter — they will be overwritten by the Excel data.
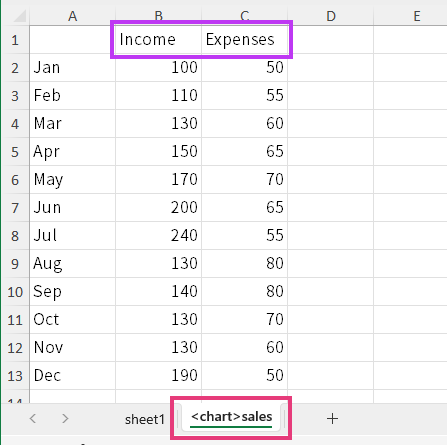
Excel workbook
Create a new worksheet and fill it with the chart data. The worksheet name should be the same as the chart name (alt text).
Categories should be in column A. Series names should be in row 1.
Series with corresponding names in the template will be overwritten. New series will be added.
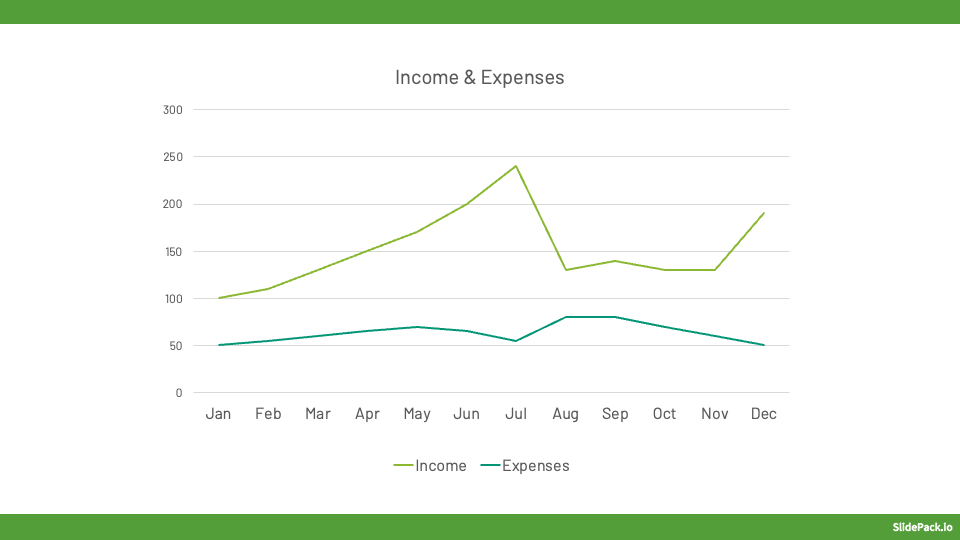
Render results
The number of series in the chart will be adjusted to accomodate the data. Colors for newly added series will be set automatically by PowerPoint.
output.pptx
Placing images and videos
PowerPoint template
Place a shape where you want your image or video to be.
In it, insert text that refers to Excel cell coordinates, surrounded by curly braces. For example: {B5}.
You can optionally specify a worksheet name, like {Sheet3:B5}.
template.pptx

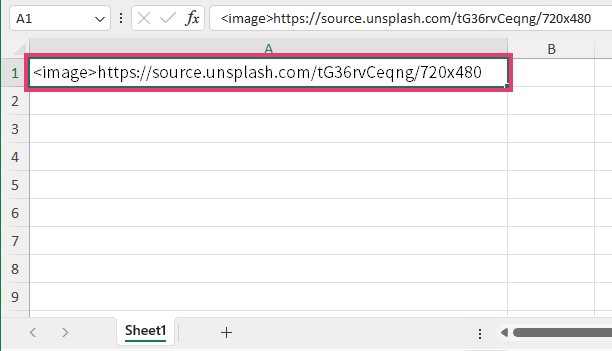
Excel workbook
In the cell you referred to, place a URL to your image, prefixed with <image>.
For example: <image>https://source.unsplash.com/tG36rvCeqng/720x480.
Supported formats are jpg, jpeg, gif, and png.
For videos, use <video> followed by a YouTube URL.
For example: <video>https://www.youtube.com/watch?v=fIlJyZEbrzo.
The Render from Excel feature only supports images and videos that are publicly available through a URL. For videos, YouTube is currently the only supported video host. Use the API to upload and embed private files.
Render results
The shape will be replaced by the image or video.
output.pptx

Notes
- The number of slides generated counts towards your rendering limit. See API limits for details.
- Render results expire in 24 hours and will no longer be available for download. Please re-render if necessary.